
# To Create the Menu
Defining a Menu
You must define a menu before you can add items to it.
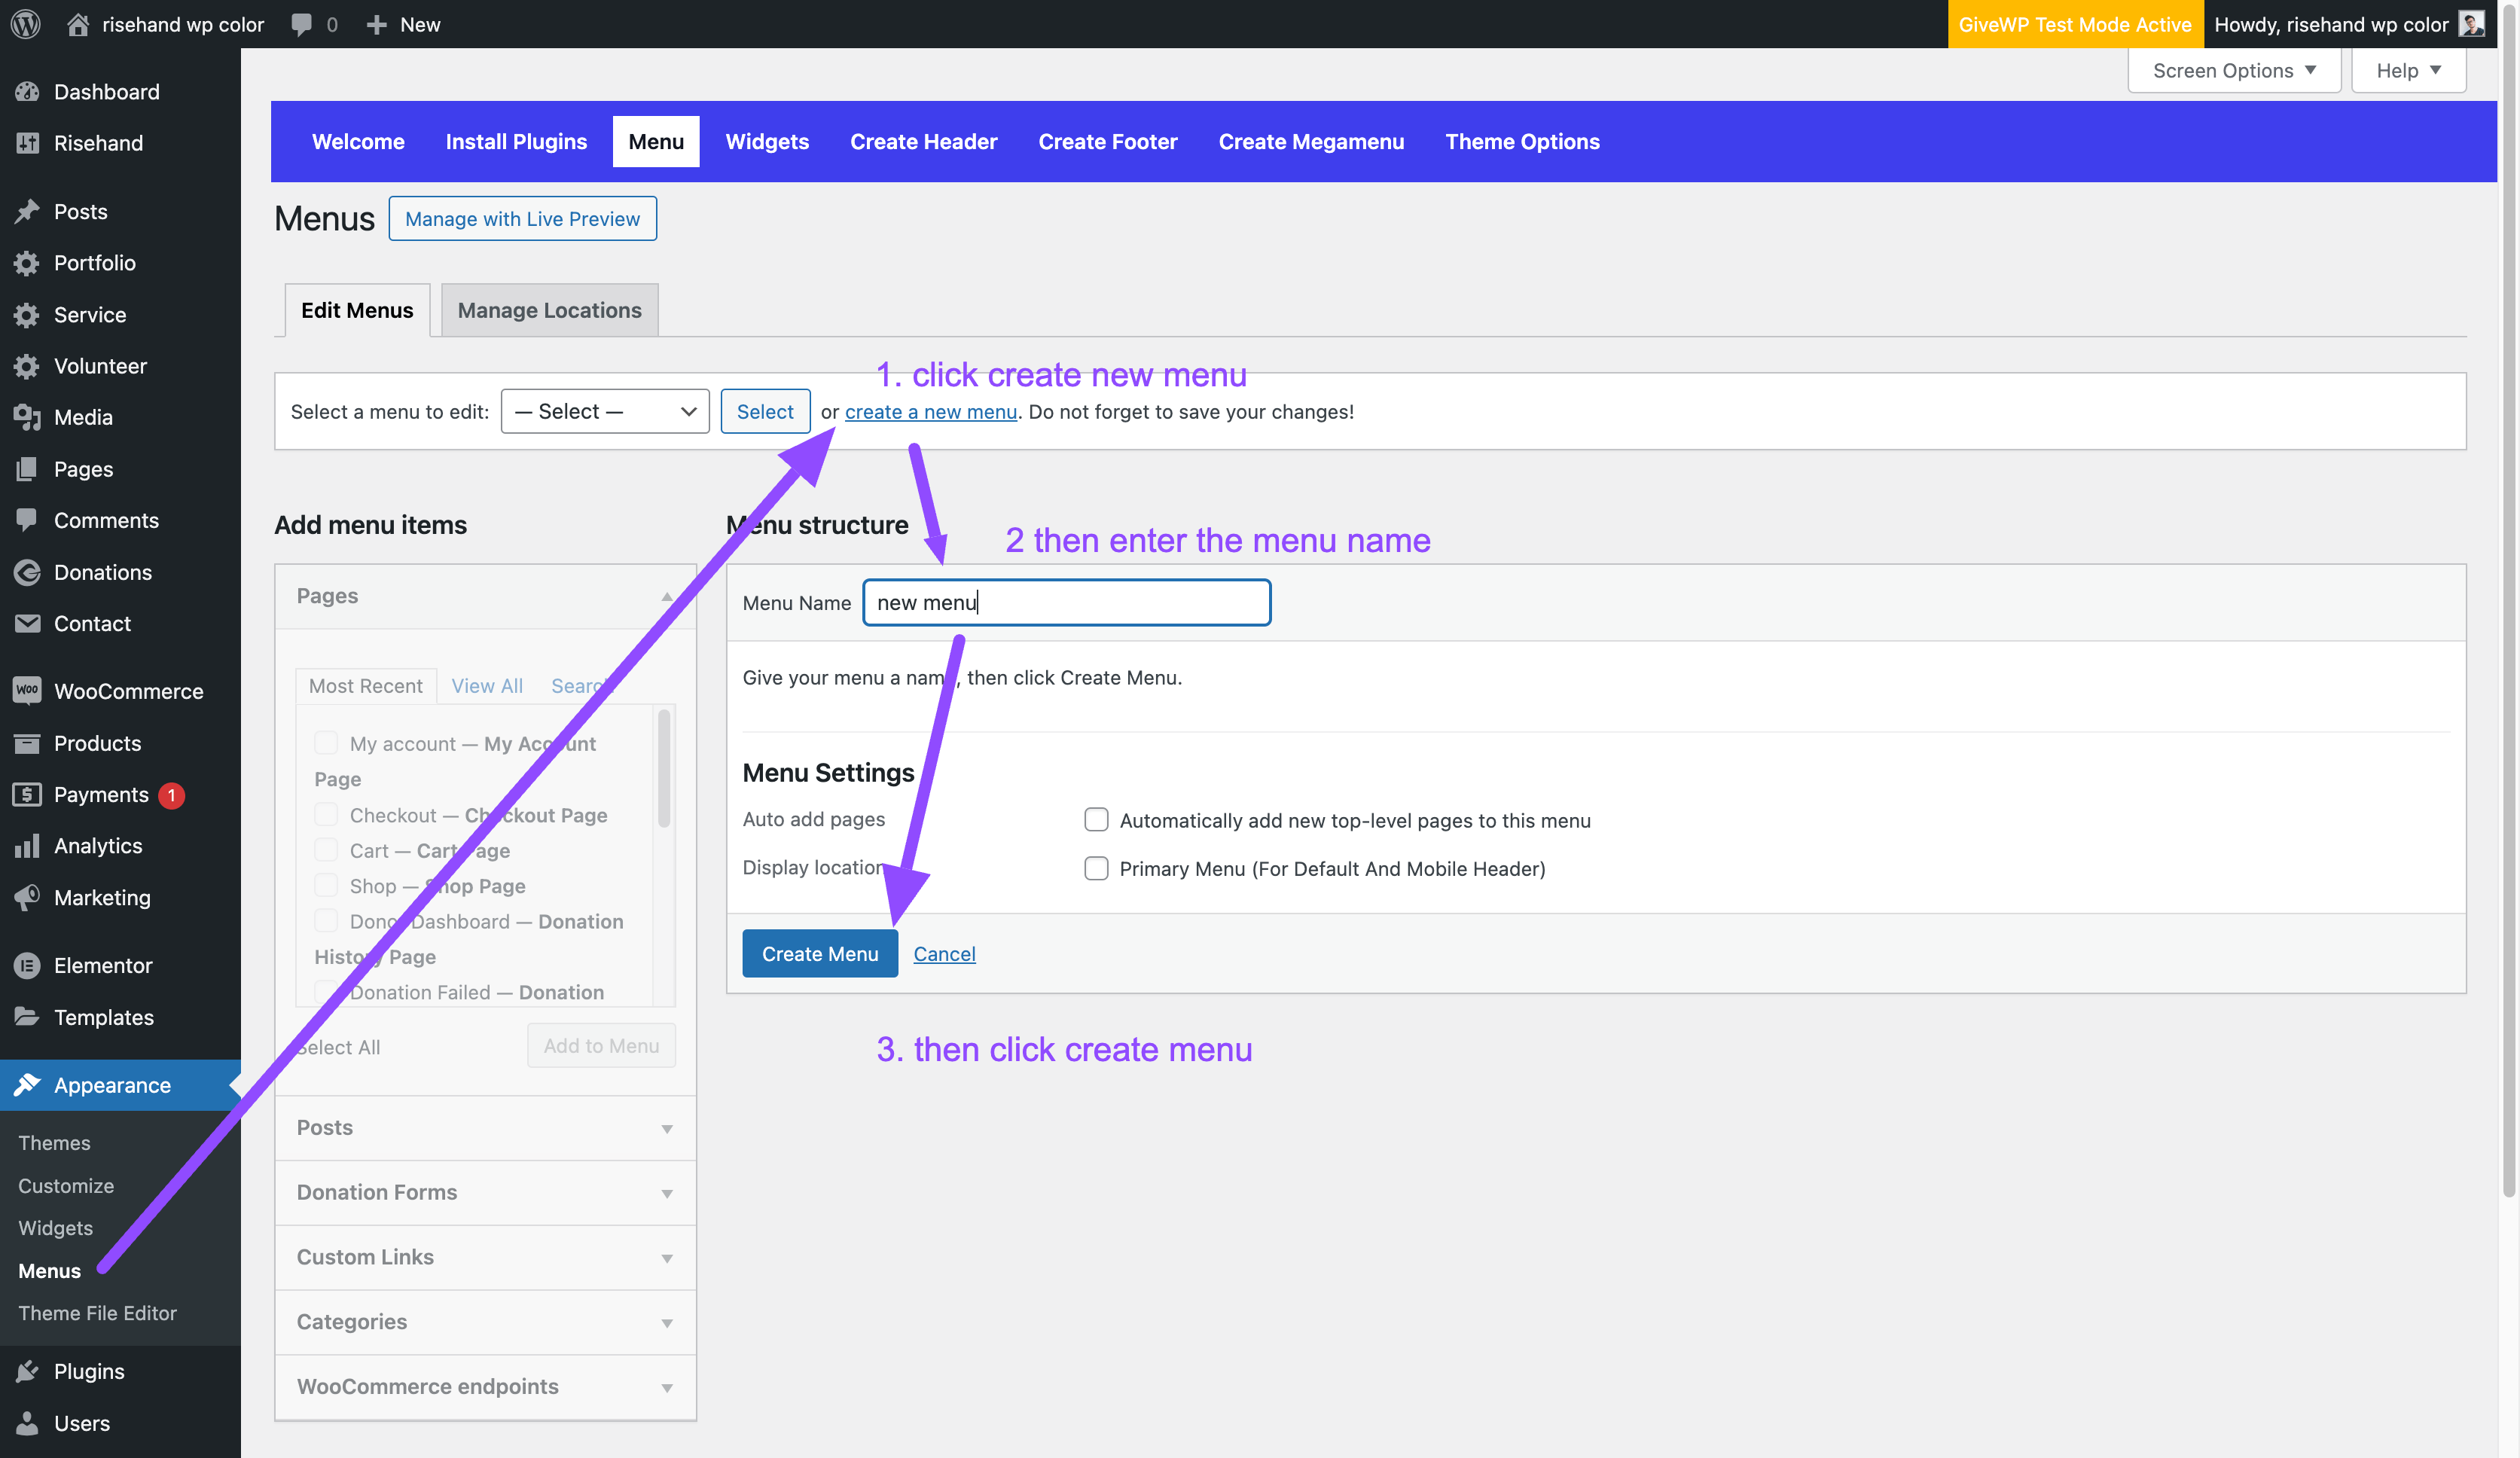
- Go to 'Appearance' menu on the left-hand side of the Dashboard, select the 'Menus' option to bring up the Menu Editor.
- Select Create a new menu at the top of the page
- Enter a name for your new menu in the Menu Name box
- Click the Create Menu button.
Your new custom menu has now been defined.
# Adding Items to a Menu
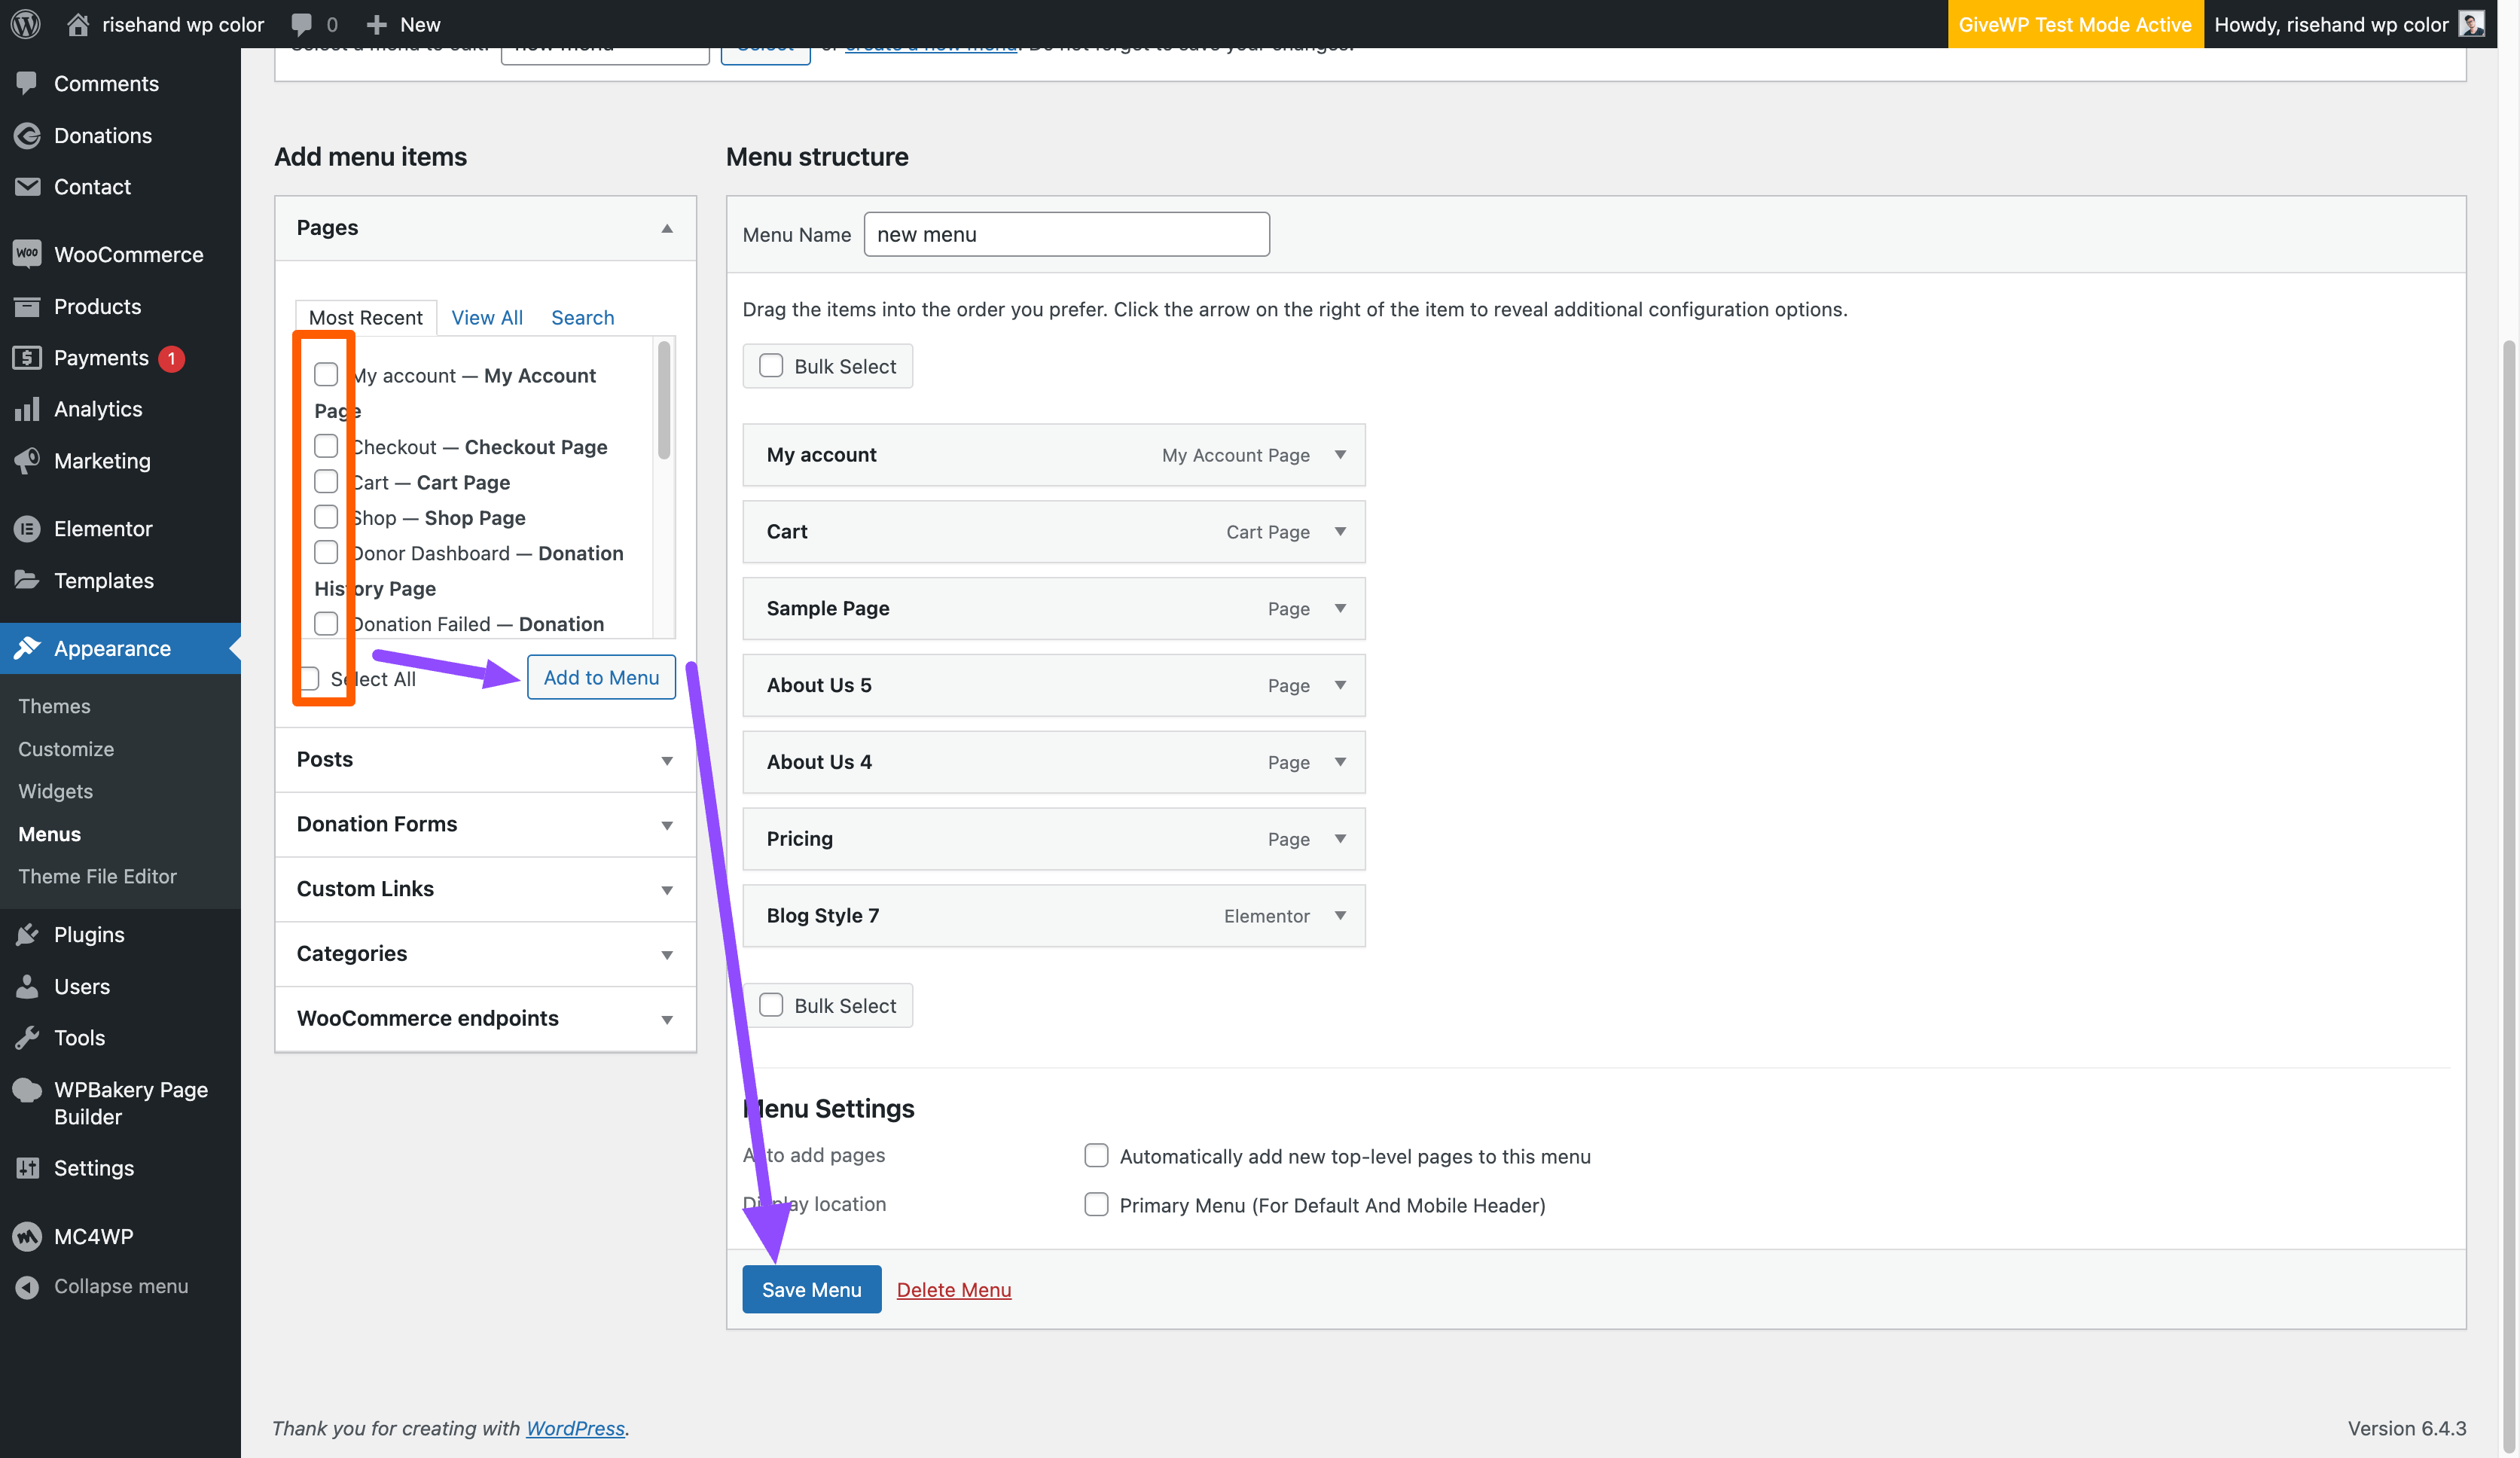
Your custom menu has now been saved.
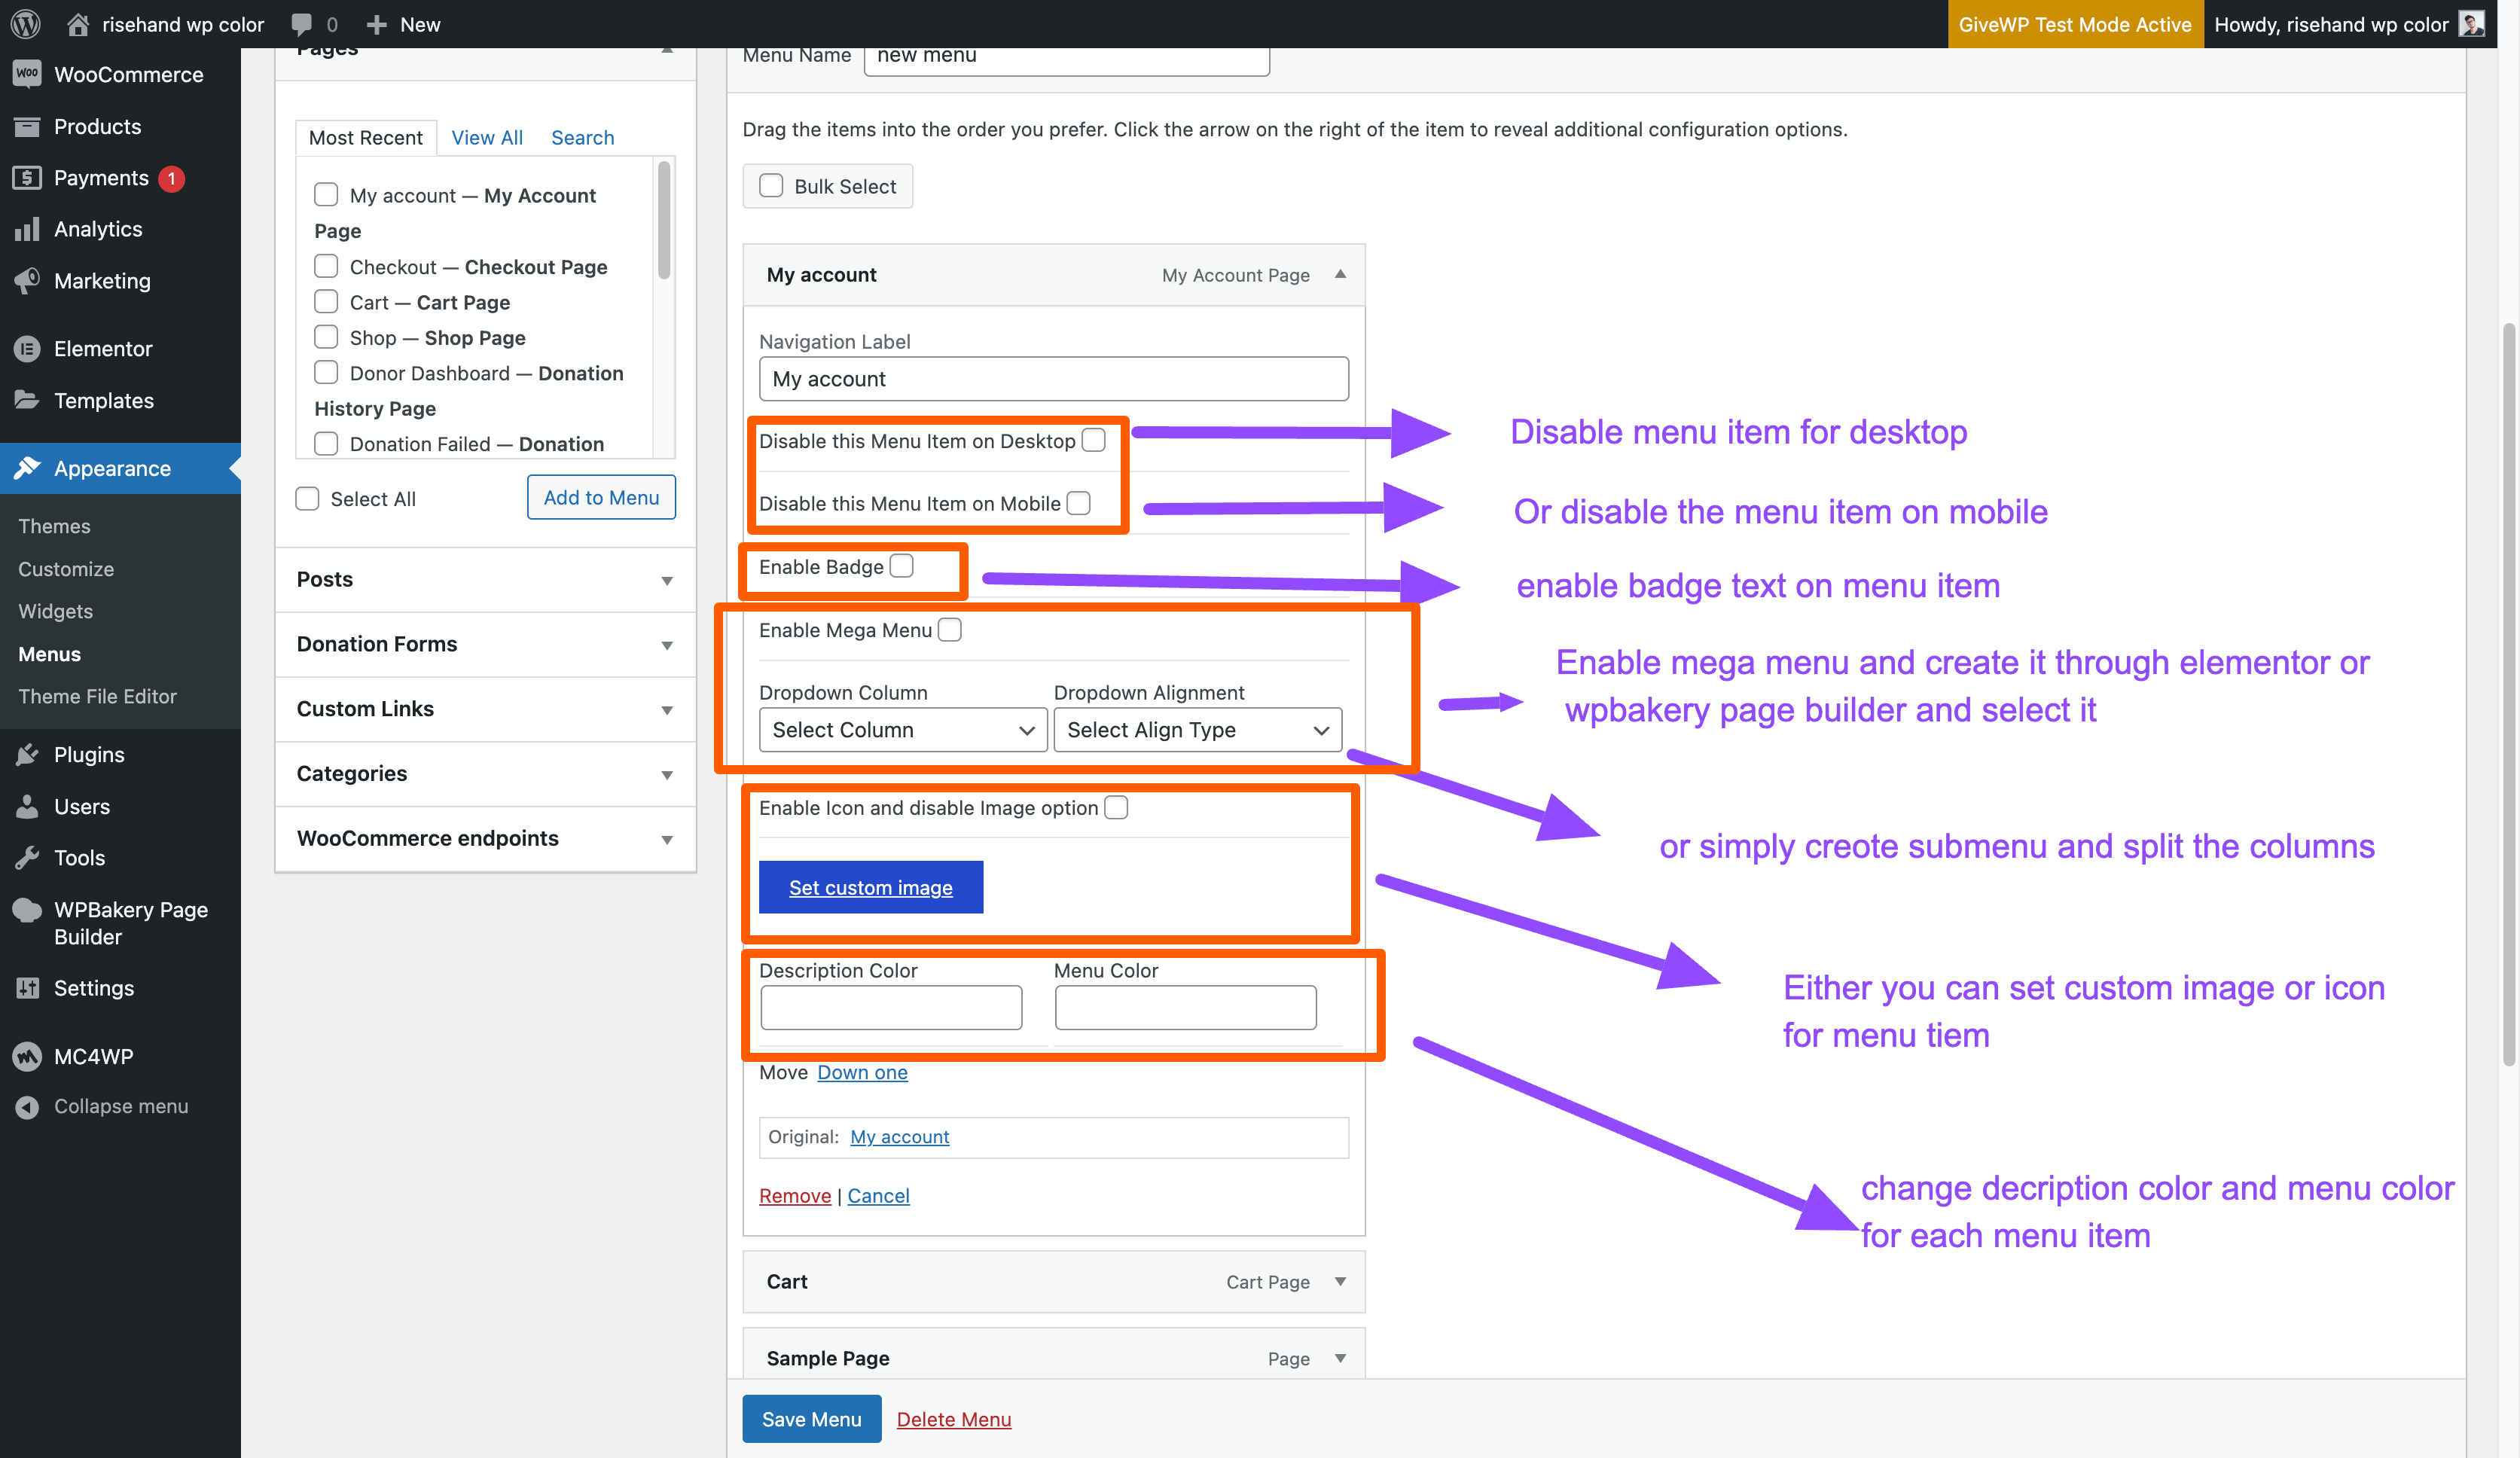
# Find more option on menu area
Editing and Displaying Headers in WordPress
Editing the Header with Elementor
- Go to your WordPress Dashboard.
- Navigate to CoreIT → Header.
- Find and edit the header post with Elementor.
- This will open the Elementor editor, where you can modify the content, logo, and menu.
Setting a Global Header for the Entire Site
- Go to CoreIT → Theme Options.
- Navigate to CoreIt Header and Footer Settings.
- Under Header Options, find Header Custom Enable/Disable.
- Enable custom headers and select your preferred Header Style.
Assigning Different Headers for Specific Pages
# To Select header for entire site and change header for particular page , post , team , portfolio and service
Header Options Setup
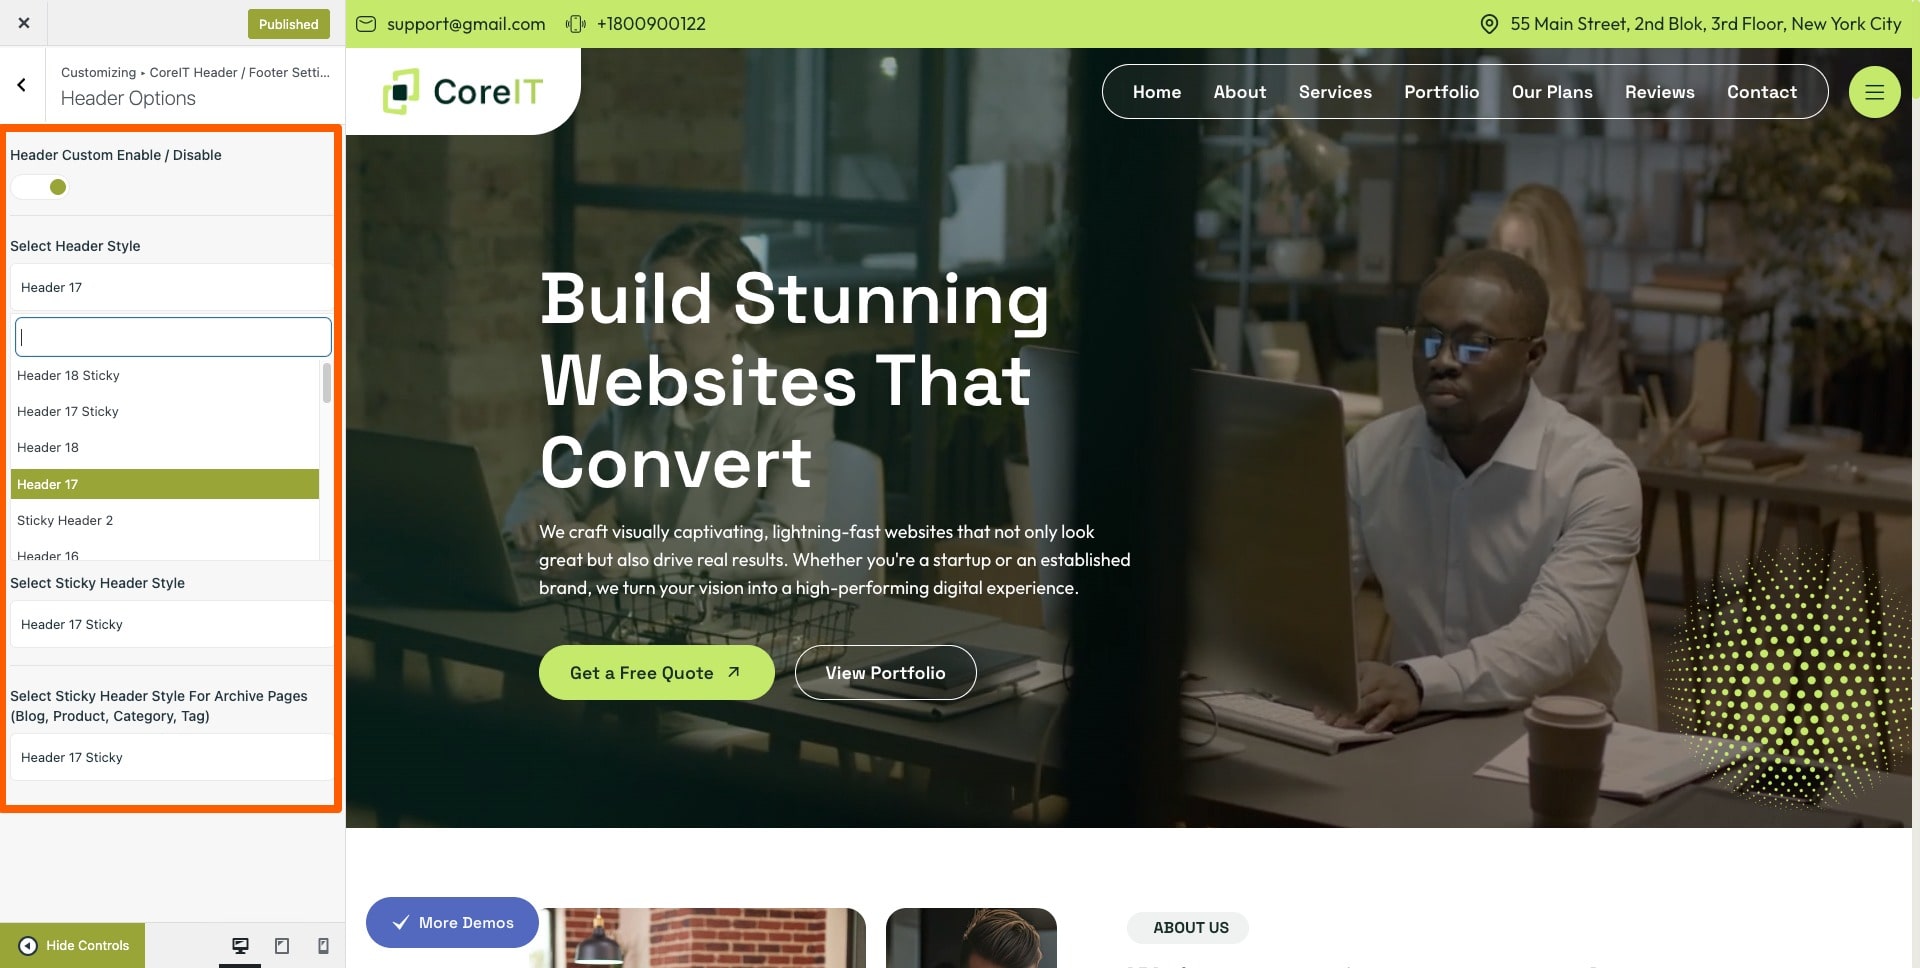
1. Navigate to Customizing > CoreIT Header/Footer Settings > Header Options
Standard Header Setup
2. Find Header Custom Enable/Disable toggle
Switch it ON (the green dot indicates it's currently enabled)
3. Under Select Header Style, choose your preferred header style from the dropdown
Example: "Header 17"
Archive Pages Header Setup
4. Find Select Header Style For Archive Pages (Blog, Product, Category, Tag)
Choose a header style specific for these page types
Example: "Header 17"
Sticky Header Configuration
5. Toggle Header Sticky Enable/Disable to ON
This keeps your header visible when users scroll down the page
6. Under Select Sticky Header Style, choose your preferred sticky header style
Example: "Header 17 Sticky"
7. For archive pages, select a style under Sticky Header Style For Archive Pages
Example: "Header 17 Sticky"
8. Click the "Published" button at the top to save your changes
CoreIT Page-Specific Header and Sticky Header Settings
Quick Reference: This guide explains how to configure unique header and sticky header settings for individual pages in CoreIT theme.
Accessing Page-Specific Header Settings
1 Open the WordPress editor for the page you want to customize
Navigate to Pages → All Pages → Edit the specific page (in your case "Home 11")
2 Navigate to the Header / Footer Settings section
This section contains all the header and sticky header options for the current page
Configuring Standard Header for the Page
3 Enable custom header for this page
Find Custom Header Style Enable: and toggle it ON (green dot)
4 Select the header style
Click the Select Header Style: dropdown
Choose your preferred header style from the available options
Configuring Sticky Header for the Page
1 Enable custom sticky header
Find Custom Sticky Header Style Enable: and toggle it ON (green dot)
2 Select the sticky header style
Click the Select Sticky Header Style: dropdown
Choose your preferred sticky header style from the available options
After change the header style then click save chnges button
# To Select Footer for entire site and change Footer for particular page , post , team , portfolio and service
Footer Options Setup
1. Navigate to Customizing > CoreIT Footer/Footer Settings > Footer Options
Standard Footer Setup
2. Find Footer Custom Enable/Disable toggle
Switch it ON (the green dot indicates it's currently enabled)
3. Under Select Footer Style, choose your preferred Footer style from the dropdown
Example: "Footer 17"
8. Click the "Published" button at the top to save your changes

CoreIT Page-Specific Footer and Sticky Footer Settings
Quick Reference: This guide explains how to configure unique Footer and sticky Footer settings for individual pages in CoreIT theme.
Accessing Page-Specific Footer Settings
1 Open the WordPress editor for the page you want to customize
Navigate to Pages → All Pages → Edit the specific page (in your case "Home 11")
Configuring Standard Footer for the Page
3 Enable custom Footer for this page
Find Custom Footer Style Enable: and toggle it ON (green dot)
4 Select the Footer style
Click the Select Footer Style: dropdown
Choose your preferred Footer style from the available options
After change the Footer style then click save chnges button
