
# Theme Requirements
To use CoreIT, please make sure you are running WordPress 6 or higher, PHP 7.4 or higher, and MySQL 5.6 or higher. We have tested it with Mac, Windows. Besides, please check the recommended server configuration for proper theme functioning: Our Recommended Version above wordpress 5.5 and php 7.4.
Minimum server configuration
- PHP version - 7.4 and higher (Tested Up to 8.2)
- MySQL version - 5.6 or higher
- PHP Post Max Size => 256M or 512M
- Max Upload Size => 256M or 512M
- PHP Time Limit – 1000
- max_input_time – 300
- PHP Max Input Vars – 4000 and above
Or Check your server Configuration on your Wordpress Dashboard -==> Go to CoreIT -==> About CoreIT

# Files Included in CoreIT Package
Files Included in Packages
- CoreIT.zip , CoreIT-child.zip This is the Theme You want To use to build site.
- Documentation : This Folder Contains Docmentation Link
- Demo-content : This Folder contains demo data files For Impot Dummy Content
- Licensing : This folder contains coygen theme License.
- Theme-core-plugin : This folder contains coygen Core pluign.
- CoreIT Icons : This folder contains CoreIT icons We used in our theme.
# To Install Theme , Pluign Installation and Import Demo Content
There are two ways to upload the theme. Please follow the steps below.
1. Via WordPress Dashboard
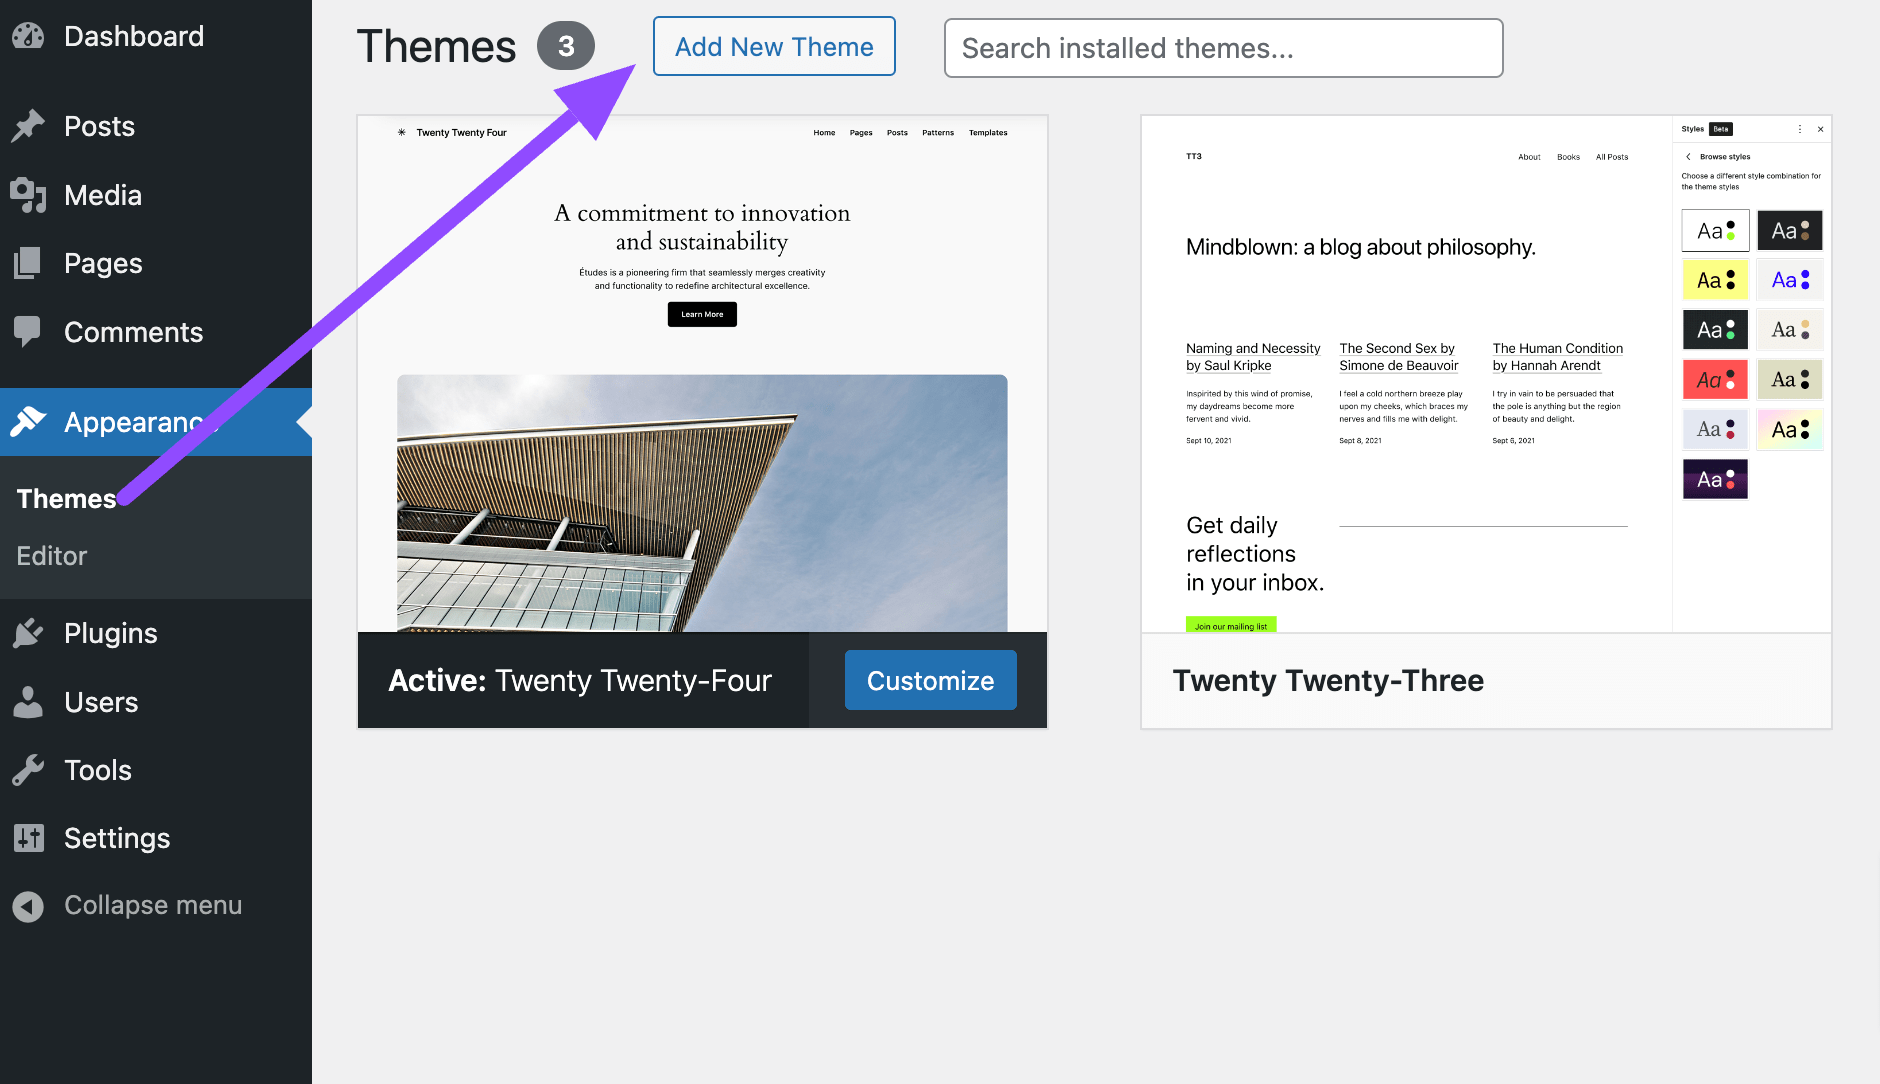
- Navigate to Appearance → Themes in your WordPress admin dashboard.
- Click the Add New button at the top of the page, then select the Upload Theme option.
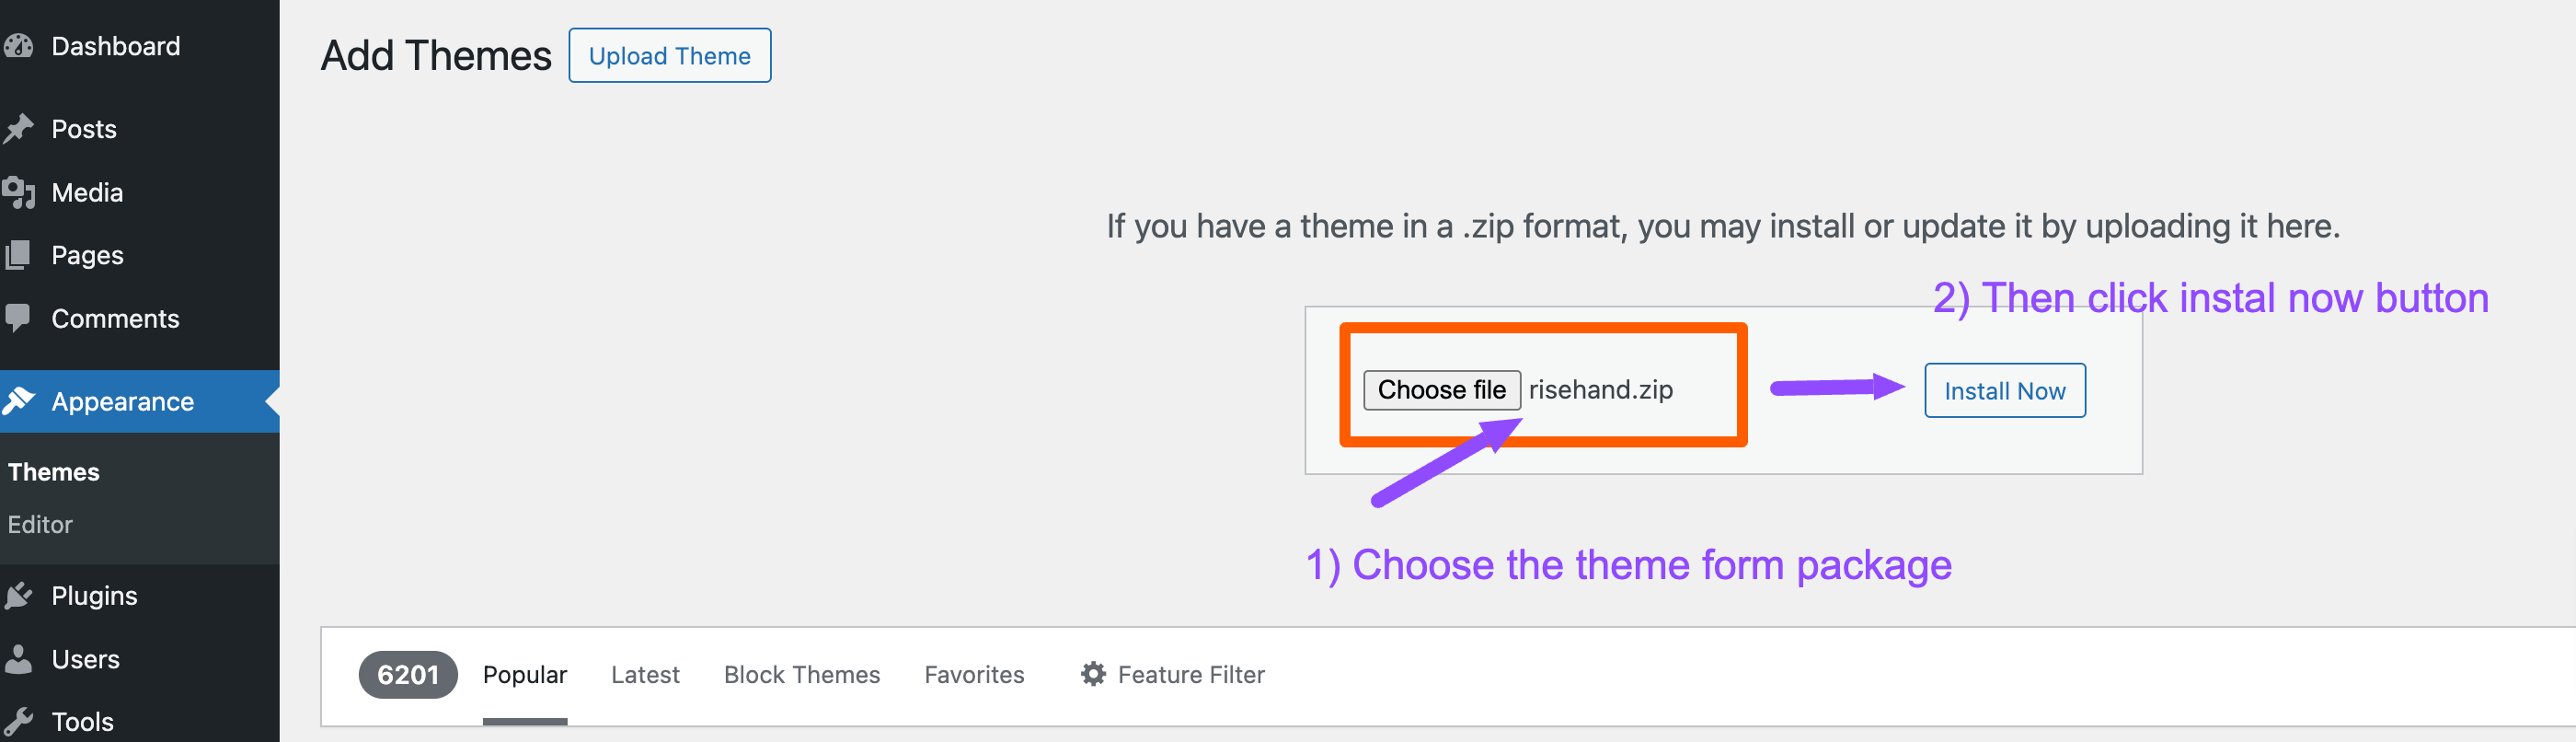
- Choose the theme file: Theme Files / CoreIT.zip from the downloaded package and click Install Now.
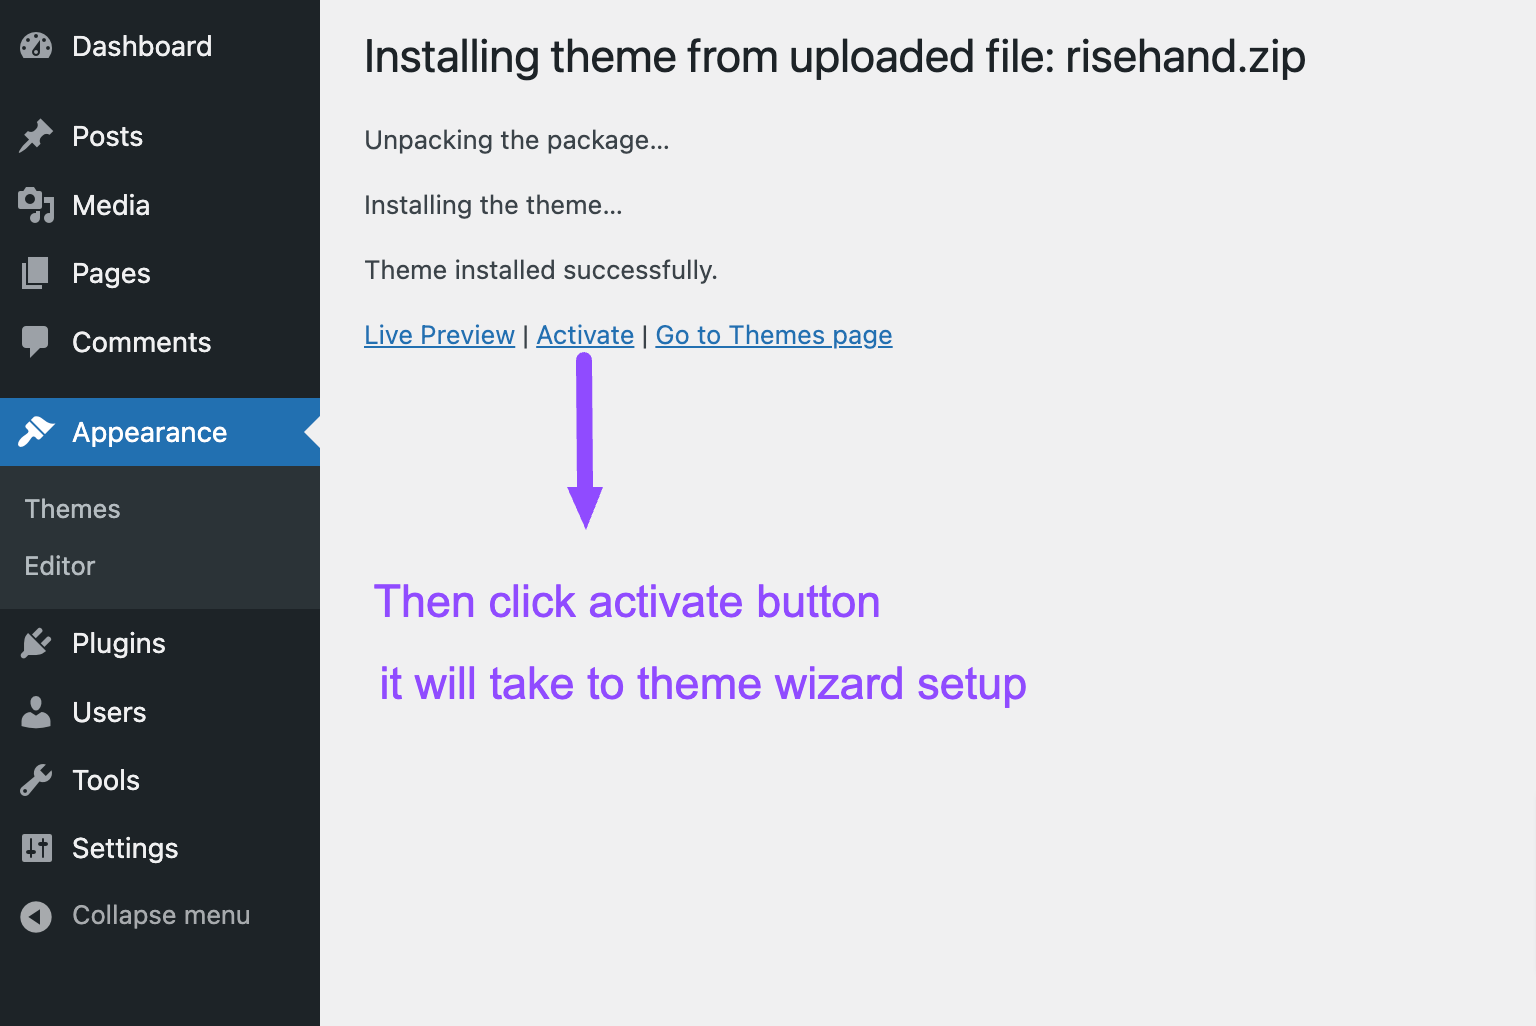
- Once the installation is complete, click Activate. This will redirect you to the theme setup wizard.
- Follow the steps in the setup wizard to:
- Install the child theme.
- Install required plugins.
- Import demo content.
- After the demo import is complete, click View Your Website to see the setup in action.
Note: If the setup wizard does not appear automatically after activation, go to CoreIT → Theme Setup / Import Demo in the admin panel to launch the setup wizard manually.
Screenshots:
Video Guide:
2. Via FTP (Recommended)
- Extract the downloaded theme package: CoreIT-main-package.zip.
- Open the extracted folder and locate the theme files.
- Use an FTP client such as FileZilla to connect to your server.
- Navigate to the WordPress themes directory:
/wp-content/themes/ - Upload the CoreIT folder from the extracted theme files.
- Once the upload is complete, go to Appearance → Themes in your WordPress admin dashboard.
- Click Activate to enable the theme.
- Proceed to install the required plugins and import demo content as needed.
Following these steps will ensure a smooth installation of your WordPress theme and demo content setup.
# After Import Enable the responsive breakpoints in elementor ( Must )
Follow below video to enable responsive breakpoints in elementor
Add and customize breakpoints
By default, the Elementor Editor creates pages for three types of devices – PCs, portrait tablets and portrait mobiles, with breakpoints of 1024px for tablets and 767px for mobiles. Some creators want the option of creating their own breakpoints or adding additional devices for greater design flexibility. Such tablets can include widescreen PCs, landscape tablets and mobiles and more.
Using the Elementor Editor site settings, you can edit the breakpoints of the default devices and add additional devices with their breakpoints.
Access breakpoints
Breakpoints are accessed through the Site Settings.
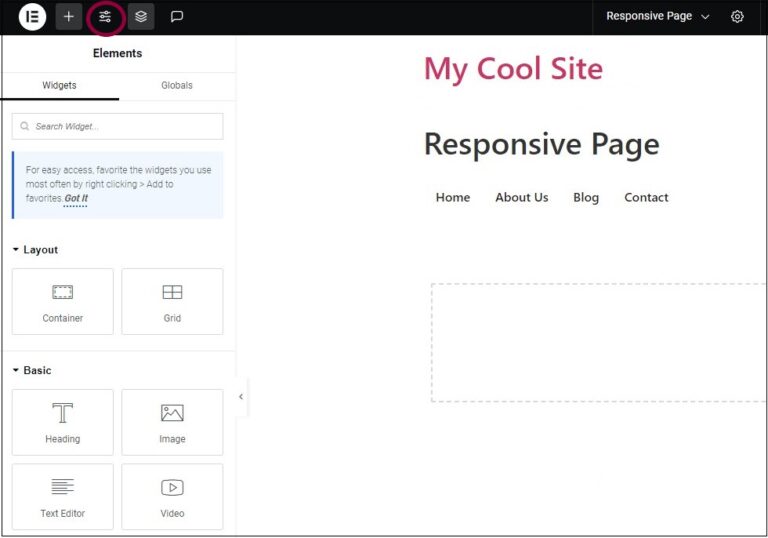
- On the toolbar, click the
 icon to select Site Settings.
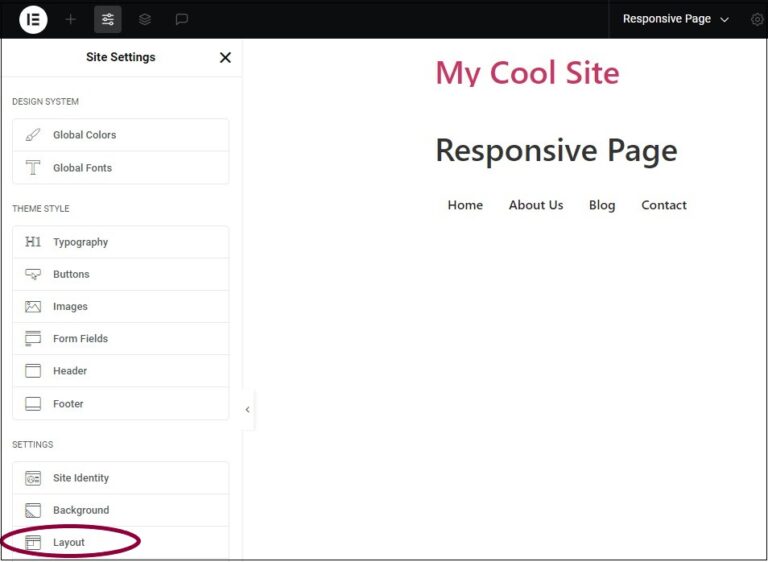
- From the menu, under Settings, select Layout.
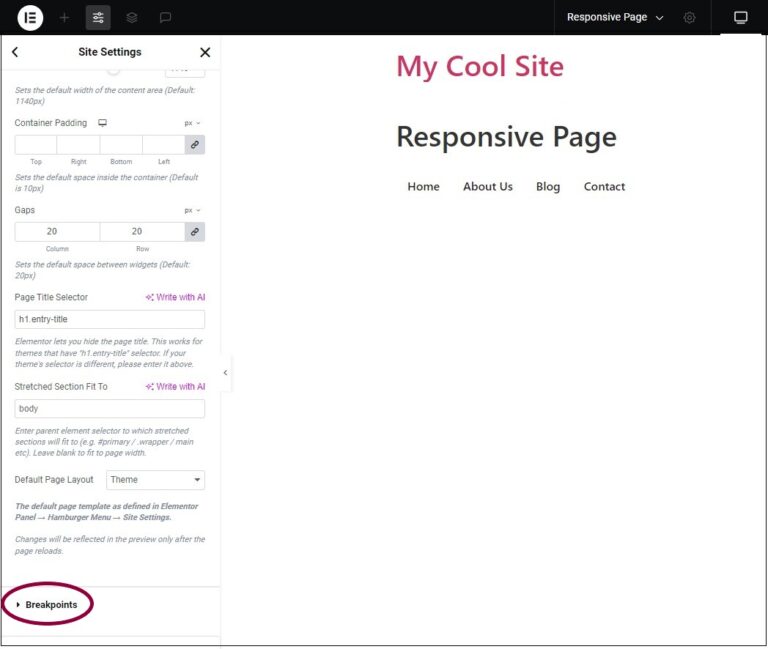
- In the panel, scroll down to Breakpoints and expand it.
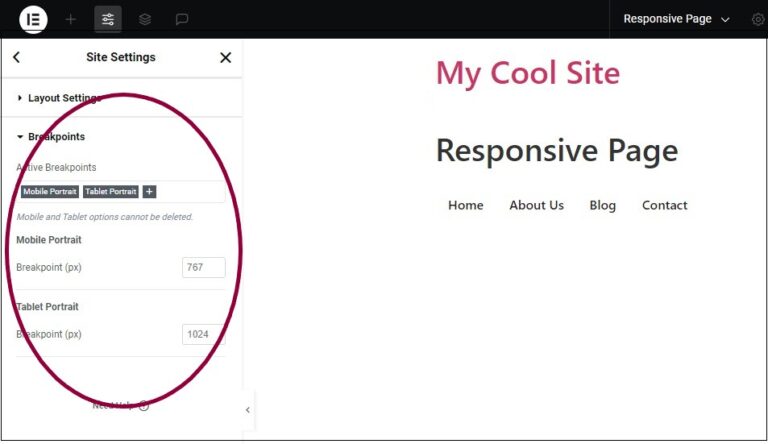
You can now edit the breakpoints.
Add a breakpoint
For creators who want to accommodate a greater range of devices and uses, you can add additional breakpoints.
- Access the breakpoint menu as detailed above.

- In the Active Breakpoints section, click the plus icon

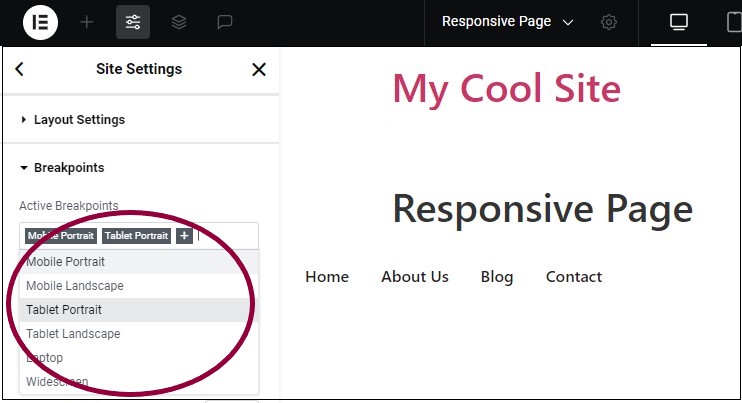
- From the dropdown menu, select all breakpoint options and click save changes button.
# Troubleshoot Options for Elementor
CSS changes do not appear immediately after adding them to websites.
Solution
Following are the suggested solutions.
Regenerate CSS
Follow the below steps:
- Go to Elementor > Tools > General.

- Click Regenerate Files & Data.
- Click Save Changes.
# To Set up the Homepage & BlogTeam
- Go to Settings > Reading in your WordPress dashboard.
- Under Your homepage displays, select A static page.
- Choose your desired page for the Homepage and another page for the Posts page (blog).
- Click Save Changes to apply the settings.

# To enable maintenance mode , 404 Page Settings , Site Cookies
Accessing the Customizer
- Log into your WordPress admin dashboard
- Navigate to Appearance → Customize
- Look for the "CoreIT 404 / Maintenance Mode / Cookies Settings" panel
404 Page Settings
The 404 settings allow you to customize your site's "Page Not Found" experience:
- Navigate to "404 Settings" section
- Use the "Select Blocks for 404" dropdown to choose from your available blocks Posts
- The selected block will be displayed when visitors encounter a 404 error
Maintenance Mode
Maintenance mode lets you temporarily restrict access to your site while performing updates:
- Navigate to "Maintenance Mode Settings" section
- Configure the following options:
- Enable Maintenance Mode: Toggle this checkbox to activate/deactivate maintenance mode
- Select Blocks for Maintenance Mode: Choose the block to display during maintenance (only visible when maintenance mode is enabled)
Cookie Consent Settings
Manage your site's cookie consent notice:
- Navigate to "Cookies Settings" section
- Configure the following options:
- Enable Cookies: Toggle to show/hide the cookie consent notice
- Cookies Description: Customize the message shown to visitors (default: "This website uses cookies to ensure you get the best experience on our website.")
- Cookies Button Text: Modify the acceptance button text (default: "Accept")
Important Notes
- All changes are applied in real-time using the WordPress customizer's preview
- The maintenance mode setting will restrict site access to logged-in administrators only
- Cookie settings help comply with privacy regulations by informing visitors about cookie usage
- Make sure to click "Publish" to save your changes
# To Know about tempalte usage for Page , Post , Ourfleet , Team and Service
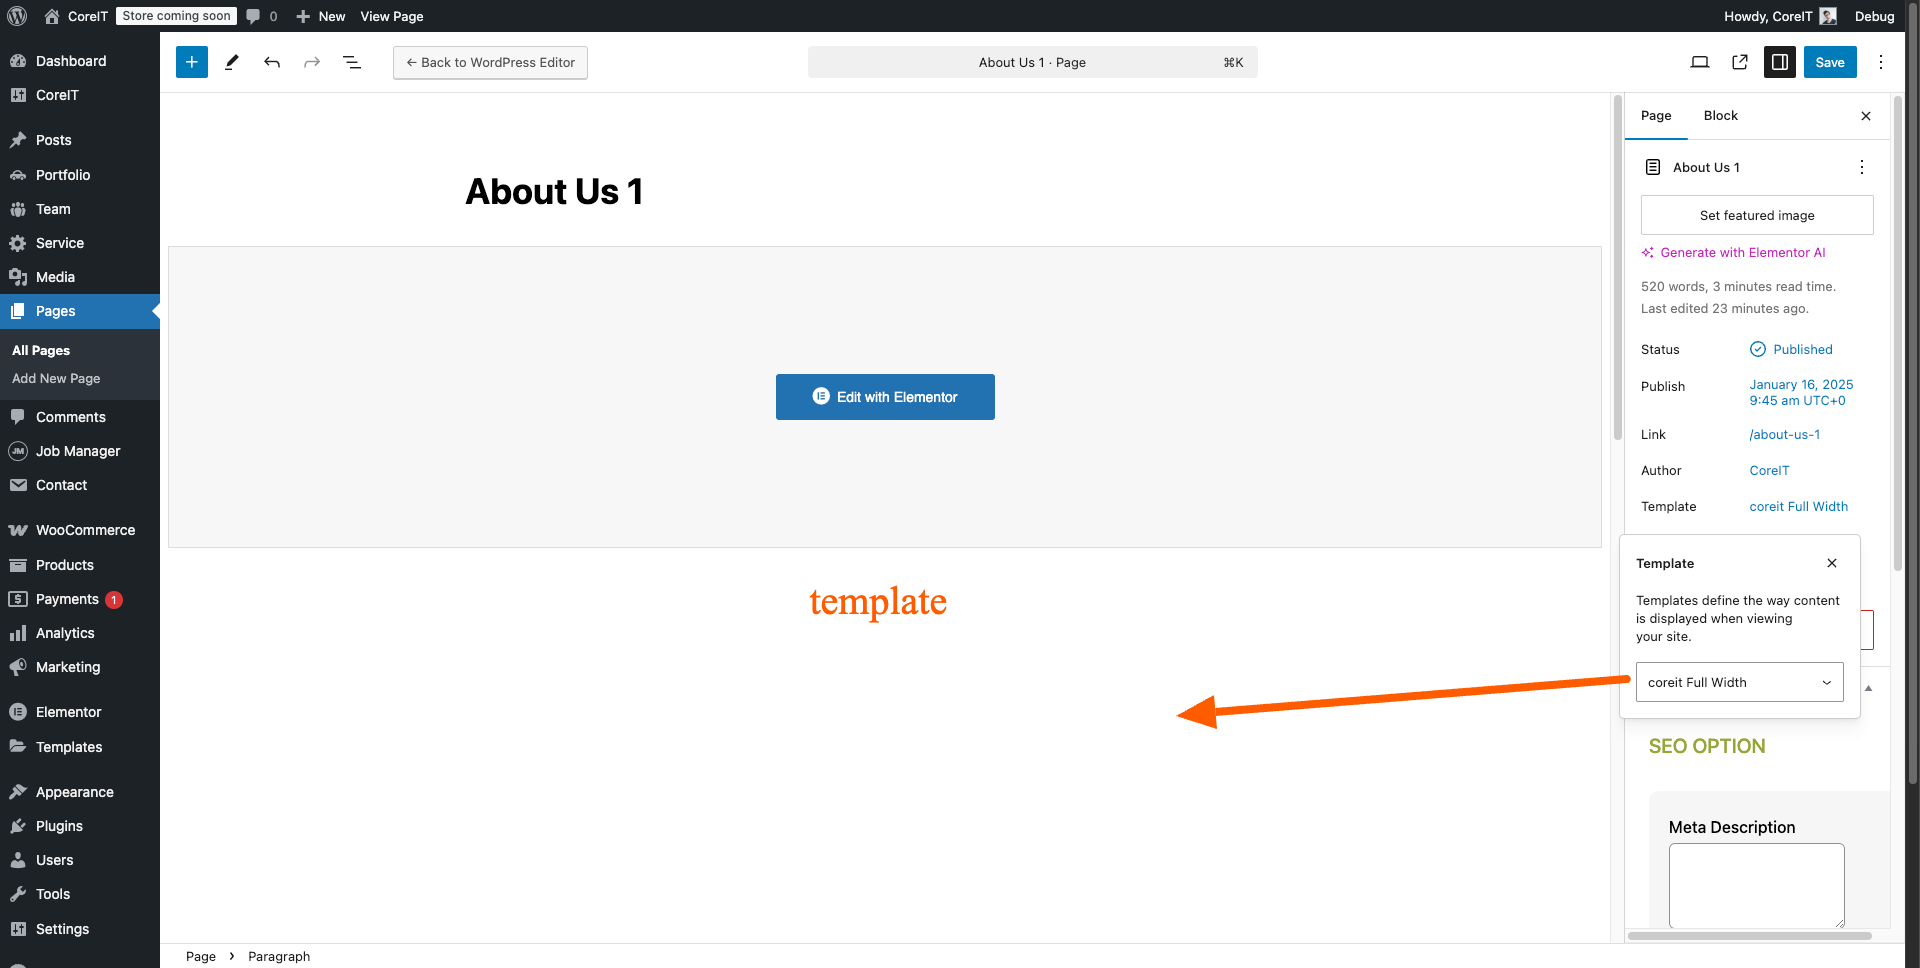
How to Find and Select Templates in WordPress
- Go to your WordPress Dashboard
- Navigate to any of these sections:
- Pages
- Posts
- Portfolio
- Team
- Services
- Edit or create a new item
- On the right sidebar of the editor, look for:
- The "Page Attributes" section
- Or the "Template" section (depending on your WordPress version)
- Click the dropdown menu labeled "Template"
- You'll see these options:
Default Template
- Includes a sidebar for navigation
- Perfect for blog posts and regular pages
- Use when you need:
- Category listings
- Recent posts widget
- Search functionality
- Archive access
- Related content display
CoreIT Boxed
- Includes page title and breadcrumb
- Has 60px padding and light background
- Best for:
- Service description pages
- Team member profiles
- Contact pages
- About us sections
- Professional content that needs structure
CoreIT Fullwidth
- Includes page title and breadcrumb
- No sidebars, full-width content
- Ideal for:
- Fleet showcase pages
- Photo galleries
- Portfolio displays
- Wide-format content
- Pages with large images
CoreIT Home Fullwidth
- No page title or breadcrumb
- Clean, empty canvas
- Perfect for:
- Homepage design
- Landing pages
- Custom layouts
- Special promotional pages
- Full-width banners and sliders
Step 7
Select your desired template and update/publish the page.
Pro Tip
Preview your page after selecting a template to ensure it matches your content needs. You can always change the template later if needed.
# To change Page title and breadcrumb settings
Page Header Settings
Basic Settings
- Enable/Disable Page Header: Customize → CoreIT Page Header Settings
- Alignment Options: Left, Center, Right
- Header Styles:
- Default (Page Title + Breadcrumb)
- Style1 (Breadcrumb Only)
Background Settings
- Background Image: Upload options for regular and blog page headers
- Background Properties:
- Cover Type: Cover, Contain, Auto
- Position: Various alignment options
- Repeat Options: No Repeat, Repeat, Horizontal, Vertical
- Attachment: Scroll, Fixed
Color Settings
- Background Color with opacity control
- Title Color with opacity control
- Breadcrumb Settings: Text, Background, Border Colors
Overview
The Page Header Settings allow you to customize the header for individual pages, posts, portfolios, services, and team members.
Where to Find Page Header Settings
- Go to WordPress Dashboard
- Navigate to Pages, Posts, Portfolio, Services, or Team
- Click Edit for the specific item
- Scroll down to Page Header Settings
Settings Options
1. Disable Page Header
Toggle ON/OFF: Hide or show the page header.
2. Page Header Image
Upload Image: Set a custom header image.
3. Mobile Page Header Image
Upload Mobile Image: Set a separate mobile header image.
4. Page Header Overlay Color
Select Color: Choose an overlay color.
5. Page Header Overlay Opacity
Enter a value (0-100): Adjust transparency.
6. Custom Page Title for Desktop
Enter text: Set a custom title for desktop.
7. Custom Page Title for Mobile
Enter text: Set a custom title for mobile.
8. Custom Breadcrumb Title
Enter text: Customize the breadcrumb title.
Example Use Cases
Customizing a Service Page Header
- Upload a service-specific header image.
- Set an overlay color with 50% opacity.
- Enter "Our Premium Services" as the page title.
Final Notes
- These settings apply to each page individually.
- If left blank, the theme’s default settings are used.
- Click Save Changes after making updates.
# Widget and Layout
Layout and Widget Management Guide
Table of Contents
- Widget Management
- Layout Settings
- Page , post , portfolio , service -Specific Layout Controls
- Theme Options
1. Widget Management
Adding Widgets
- Navigate to WordPress Dashboard → Appearance → Widgets
- Available widget areas:
- Blog Sidebar
- Page Sidebar
- Portfolio Sidebar
- Service Sidebar
- Team Sidebar
- Shop Sidebar
- Shop Single Sidebar
- Job Sidebar
- To add a widget:
- Click the + button at the top of the Widgets screen
- Select a widget
- Choose a sidebar
- Configure widget settings
- Click Update to save changes
Managing Widget Areas
- Each sidebar can contain multiple widgets
- Drag and drop to reorder widgets
- Click the dropdown arrow to access settings
- Use "Inactive widgets" for temporary storage
2. Layout Settings
Global Layout Configuration
- Go to WordPress Dashboard → Appearance → Customize
- Navigate to "CoreIT Layout Settings"
- Configure options like:
- Default Layout
- Page Layout
- Portfolio Layout
- Shop Layout
- Job Single Page Layout
- Layout options: No Sidebar, Left Sidebar, Right Sidebar
3. Page-Specific Layout Controls
Using Meta Options for Individual Pages/Posts
- Edit any page or post
- Find "Layout Settings" in the editor
- Enable "Custom Layout Option" to override global settings
- Choose a layout: No Sidebar, Left Sidebar, Right Sidebar
Sidebar Selection
- Enable "Sidebar Option"
- Select from available sidebars:
- Blog Sidebar
- Page Sidebar
- Portfolio Sidebar
- Service Sidebar
- Shop Sidebar
4. How theme Options works
Default Settings
- Default Layout: Right Sidebar
- Page Layout: Right Sidebar
- Shop Single Page Layout: No Sidebar
Modifying Theme-Wide Settings
- Access WordPress Customizer
- Go to "CoreIT Layout Settings"
- Modify layout settings
- Changes apply globally unless overridden
Best Practices
- Set up global layouts first
- Use page-specific controls only when needed
- Organize widgets logically
- Test layouts on different screens
Common Issues and Solutions
Widget Changes Not Appearing
- Click "Update" after making changes
- Clear browser cache
- Check if the correct sidebar is enabled
Layout Override Not Working
- Ensure "Custom Layout Option" is enabled
- Verify the page template supports customization
Sidebar Not Showing
- Check if the selected layout includes a sidebar
- Ensure widgets are added to the sidebar
- Enable "Sidebar Option" in settings